Hibiscus Iced Tea with Citrus - This hibiscus iced tea is ruby-red, refreshing, and bright with a clean tart finish balanced by honey and fresh citrus. The flavor is tangy and vibrant, the texture is crisp and cold, and the color looks stunning in a glass with citrus slices and clear ice. It is easy to make ahead and perfect for summer entertaining.
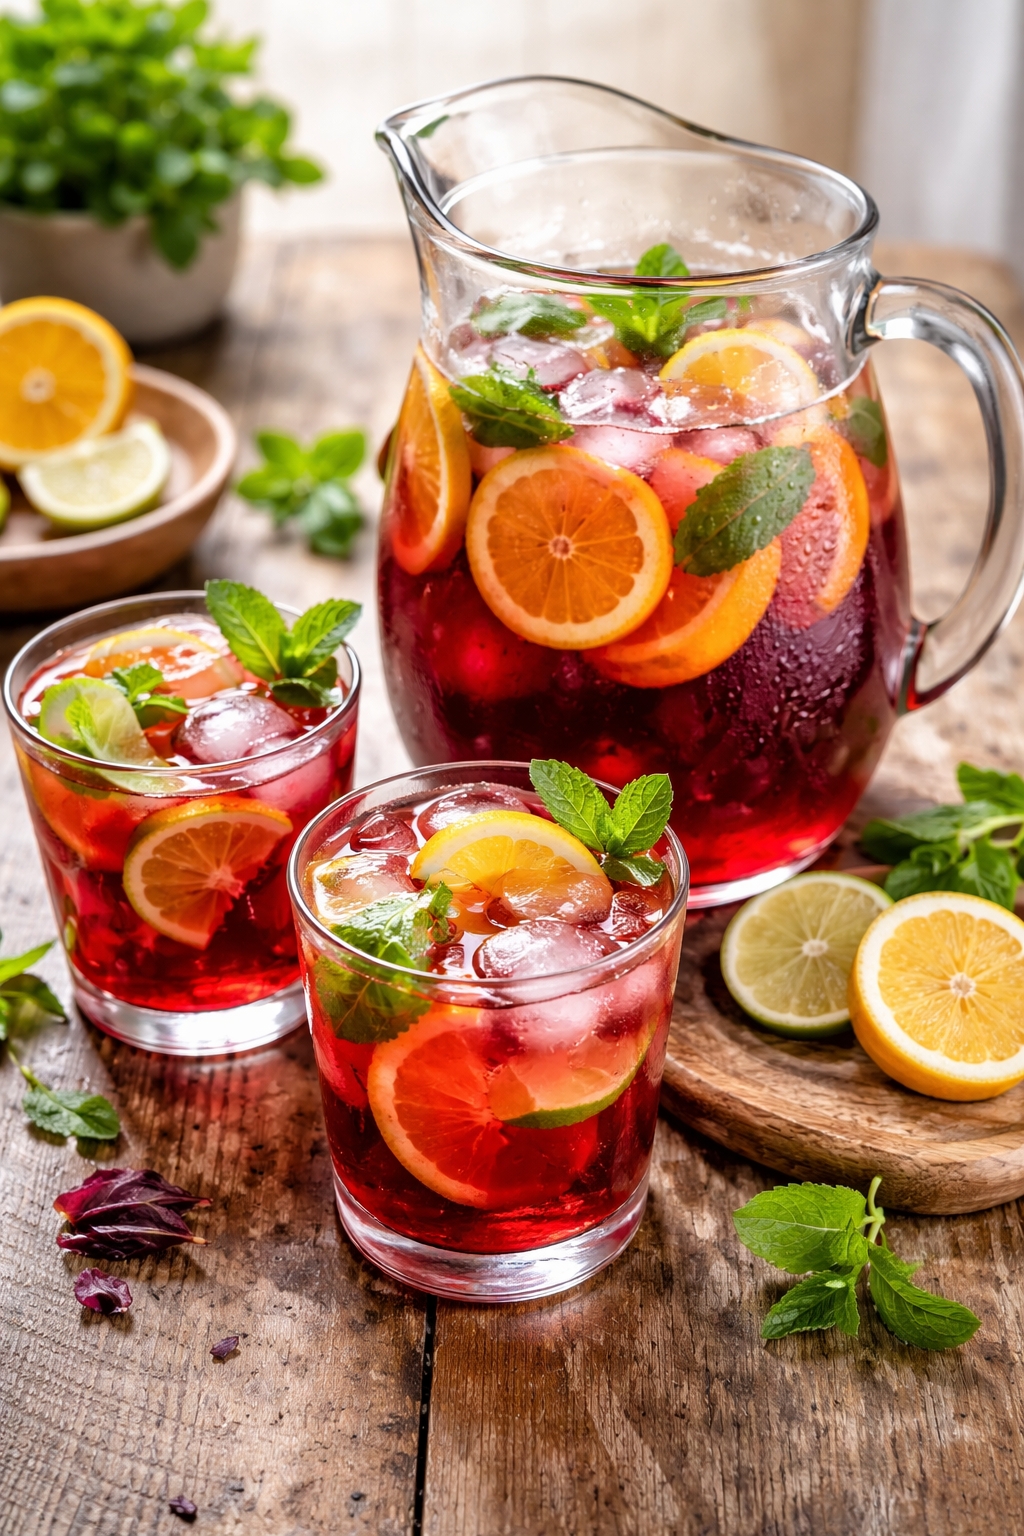
Hibiscus Iced Tea with Citrus - Hibiscus tea (often made with dried hibiscus) brews into a naturally tart, deep red infusion. The key is controlling steep time so it tastes bright, not bitter. Sweeten while the tea is warm so honey dissolves smoothly, then cool fully for clean flavor. Citrus slices add aroma and a fresh finish; adding them after chilling keeps the oils lively. Serve over plenty of ice for a crisp, refreshing drink that looks vibrant and photo-ready.
Dietary Notes
- ✓ Make-Ahead Drink
- ✓ Naturally Caffeine-Free
- ✓ Bright Citrus Flavor
- ✓ Party Pitcher Friendly
♥
Why You'll Love This
- Ruby-Red Color: Hibiscus brews a vibrant tea that looks striking over ice.
- Bright Tart Balance: Honey and citrus keep the flavor refreshing, not sharp.
- Easy Pitcher Method: Steep, sweeten, chill, and serve with minimal effort.
- Customizable Sweetness: Adjust honey and citrus to your preferred intensity.
Hibiscus Iced Tea with Citrus
👩🍳 Author: Abderrahmane
⏰ Prep Time: 10min
❄️ Cool Time: 60
🔥 Cook Time: 10min
🥨 Yield: 6
🍞 Method: No-Cook
🌾 Diet: None
★
★
★
★
★
Leave a review
1x
2x
3x
Ingredients
- 1 cup dried hibiscus flowers
- 8 cups water
- 1/3 cup honey
- 1 orange, sliced
- 1 lime, sliced
- 1 lemon, sliced
- as needed ice
- 1/4 cup fresh mint leaves

Ingredient Notes:
- dried hibiscus flowers Use fresh-smelling dried hibiscus for the brightest ruby color; oversteeping can make the tea taste bitter and overly tart.
- water Use clean-tasting water because it is the base; boiling then steeping off heat helps control harshness.
- honey Sweeten while warm so honey dissolves fully; adjust to taste to balance hibiscus tartness.
- orange, sliced Orange slices add bright citrus aroma and visual color; add after chilling so the oils stay fresh.
- lime, sliced Lime adds a crisp acidic lift; add right before serving so it doesn’t turn the tea bitter over time.
- lemon, sliced Lemon adds extra brightness; use thin slices so the citrus looks elegant and doesn’t overpower the tea.
- ice Use plenty of ice for a crisp, refreshing drink; clear ice makes the ruby tea look more vibrant.
- fresh mint leaves Mint adds a clean herbal finish; add at the end to prevent bruising and keep leaves vivid.
Instructions
-
1Bring water to a boil, then remove from heat and add dried hibiscus - off-heat steeping controls bitterness and keeps the flavor bright.
-
2Steep 8-10 minutes until ruby red, then strain - oversteeping can make hibiscus taste harsh and overly tart.
-
3Stir in honey while tea is warm until fully dissolved - warm liquid helps sweetener blend smoothly without grit.
-
4Cool to room temperature, then refrigerate at least 1 hour - chilling makes the flavor crisp and refreshing.
-
5Serve over ice with orange and lime slices - citrus oils add aroma and a bright finish.
-
6Garnish with mint if desired and serve very cold - fresh garnish keeps the drink lively and vibrant.
Nutrition Facts
Calories 90
Protein 0g
Carbs 24g
Fiber 0g
Sugar 22g
Fat 0g
Sodium 10mg
Potassium N/A
Serving Suggestions
Serve in tall glasses filled with clear ice, then add citrus slices for a fresh, colorful look. Garnish with mint if you like a greener finish. Pair with grilled foods, salads, or spicy dishes because the tart tea cleans the palate. Serve very cold for the crispest refreshment.
How to Store?
Store hibiscus tea in a sealed pitcher in the refrigerator up to 5 days. Add citrus slices just before serving for best aroma and less bitterness from peel. Do not freeze in a pitcher; it can turn cloudy when thawed. Make-ahead: brew and sweeten, then chill overnight.
Other Recipes You'll L❤️ve
If you enjoyed this Hibiscus Iced Tea with Citrus or any other recipe on my blog,
please leave a ⭐ star rating and let me know how it went
in the comments below. I appreciate you taking time to read about this recipe, thank you!
Leave a Comment