Tiny Brioche Donuts With Glaze - These tiny brioche donuts are soft and fluffy with a tender, buttery crumb that tastes bakery-level without feeling fussy. Each bite has a light chew, a delicate crisp edge from frying, and a sweet vanilla glaze that sets into a thin, shiny shell. The rich dough keeps them satisfying, while the glaze adds clean sweetness that doesn’t overwhelm. They are perfect for parties and gifting because they fry quickly in small batches and look adorable piled high on a platter.
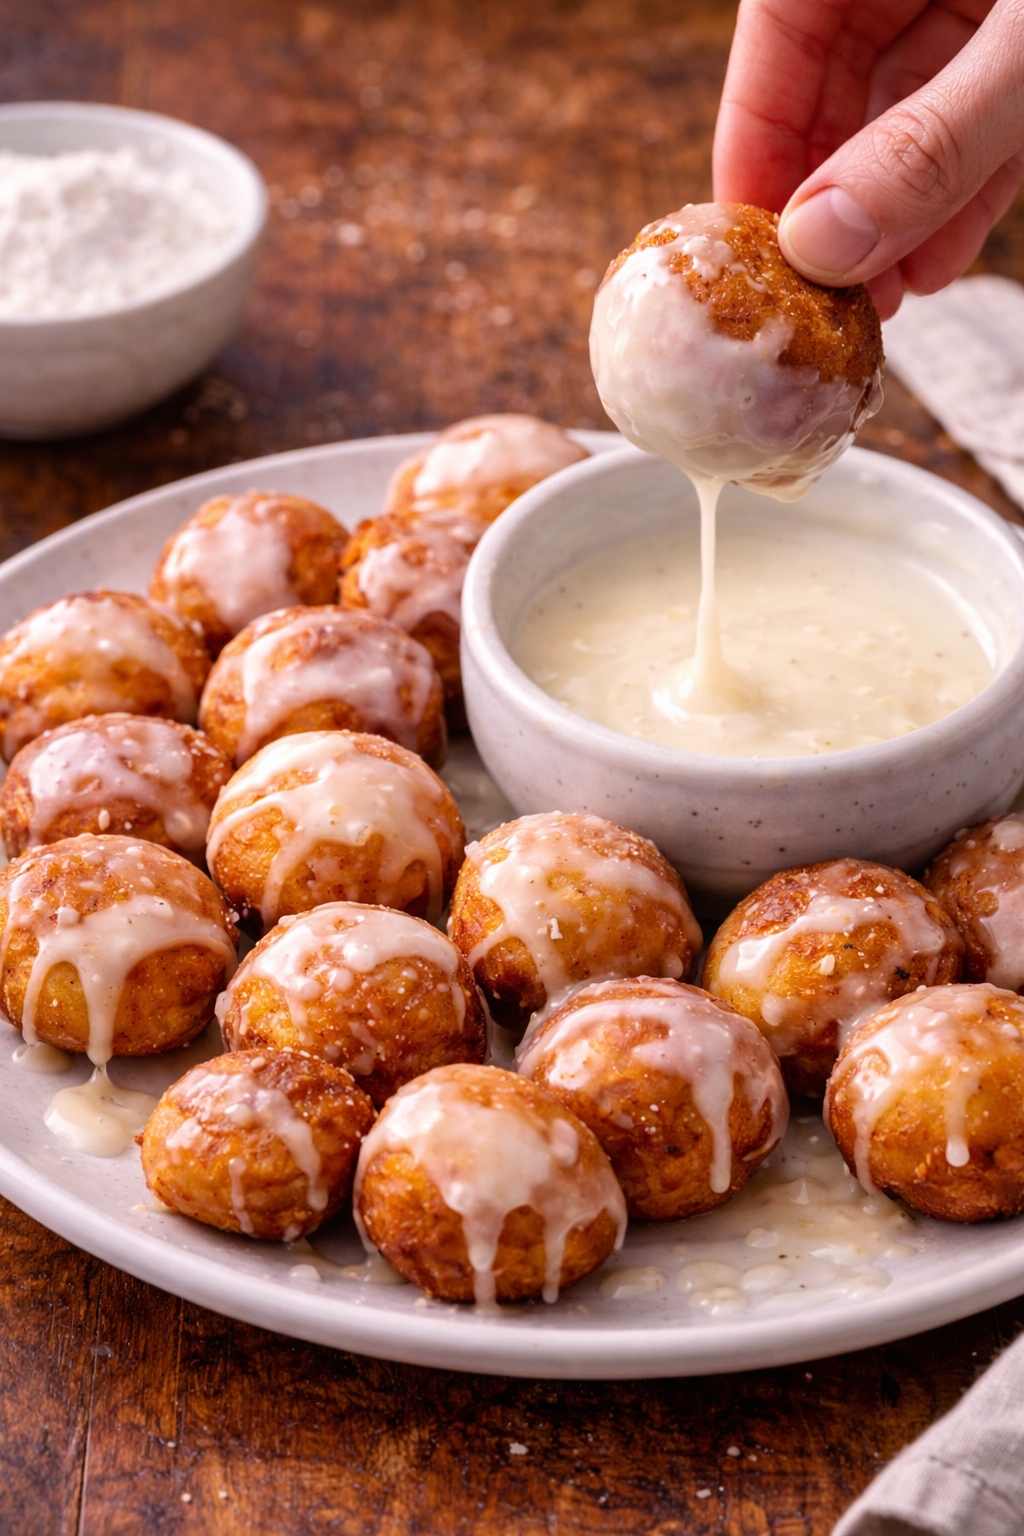
Tiny Brioche Donuts With Glaze - Brioche-style donuts succeed when you treat the dough like a structure you build, not just a batter you mix. The eggs and milk create a soft, elastic network, and the butter adds richness—but only if it is incorporated slowly so the dough can emulsify instead of turning greasy. After testing a few mixing methods, I found the most reliable approach is to mix the dough until it looks smooth and stretchy first, then add softened butter a spoonful at a time. That sequence guarantees the dough stays strong enough to trap gas during proofing, which is what gives you a fluffy interior rather than a dense, bready bite. The second key is fermentation: a cool rise in the fridge improves flavor and makes the dough easier to handle, so shaping tiny donuts feels controlled instead of sticky. Frying is where most donuts go wrong, so I built this recipe around clear cues. Keep the oil at a steady 350°F so the exterior turns golden while the center cooks through; too hot and they brown before the crumb sets, too cool and they absorb oil and feel heavy. This shows how basic ingredients create something special when you rely on approachable technique—mix well, proof patiently, fry at the right temperature—rather than complicated tricks. It aligns with my focus on technique over complexity, because once you understand the why, you can guarantee consistent, professional-looking donuts for brunch, parties, and Pinterest-worthy stacks.
Dietary Notes
- ✓ Bakery-Style At Home
- ✓ Make-Ahead Dough
- ✓ Party-Ready Mini Size
- ✓ Glossy Vanilla Glaze
♥
Why You'll Love This
- Fluffy, Tender Crumb: Proper mixing and slow butter incorporation create a soft, airy donut that stays light.
- Make-Ahead Friendly: Overnight proofing builds flavor and makes shaping fast the next day.
- Fast Fry Time: Mini donuts cook quickly in small batches with clear golden-brown cues.
- Classic Glaze Finish: A simple vanilla glaze sets into a shiny shell that looks professional and tastes clean.
Tiny Brioche Donuts With Glaze
👩🍳 Author: Abderrahmane
⏰ Prep Time: 35min
❄️ Cool Time: 480
🔥 Cook Time: 18min
🥨 Yield: 24
🍞 Method: Sautéing
🌾 Diet: Vegetarian
★
★
★
★
★
Leave a review
1x
2x
3x
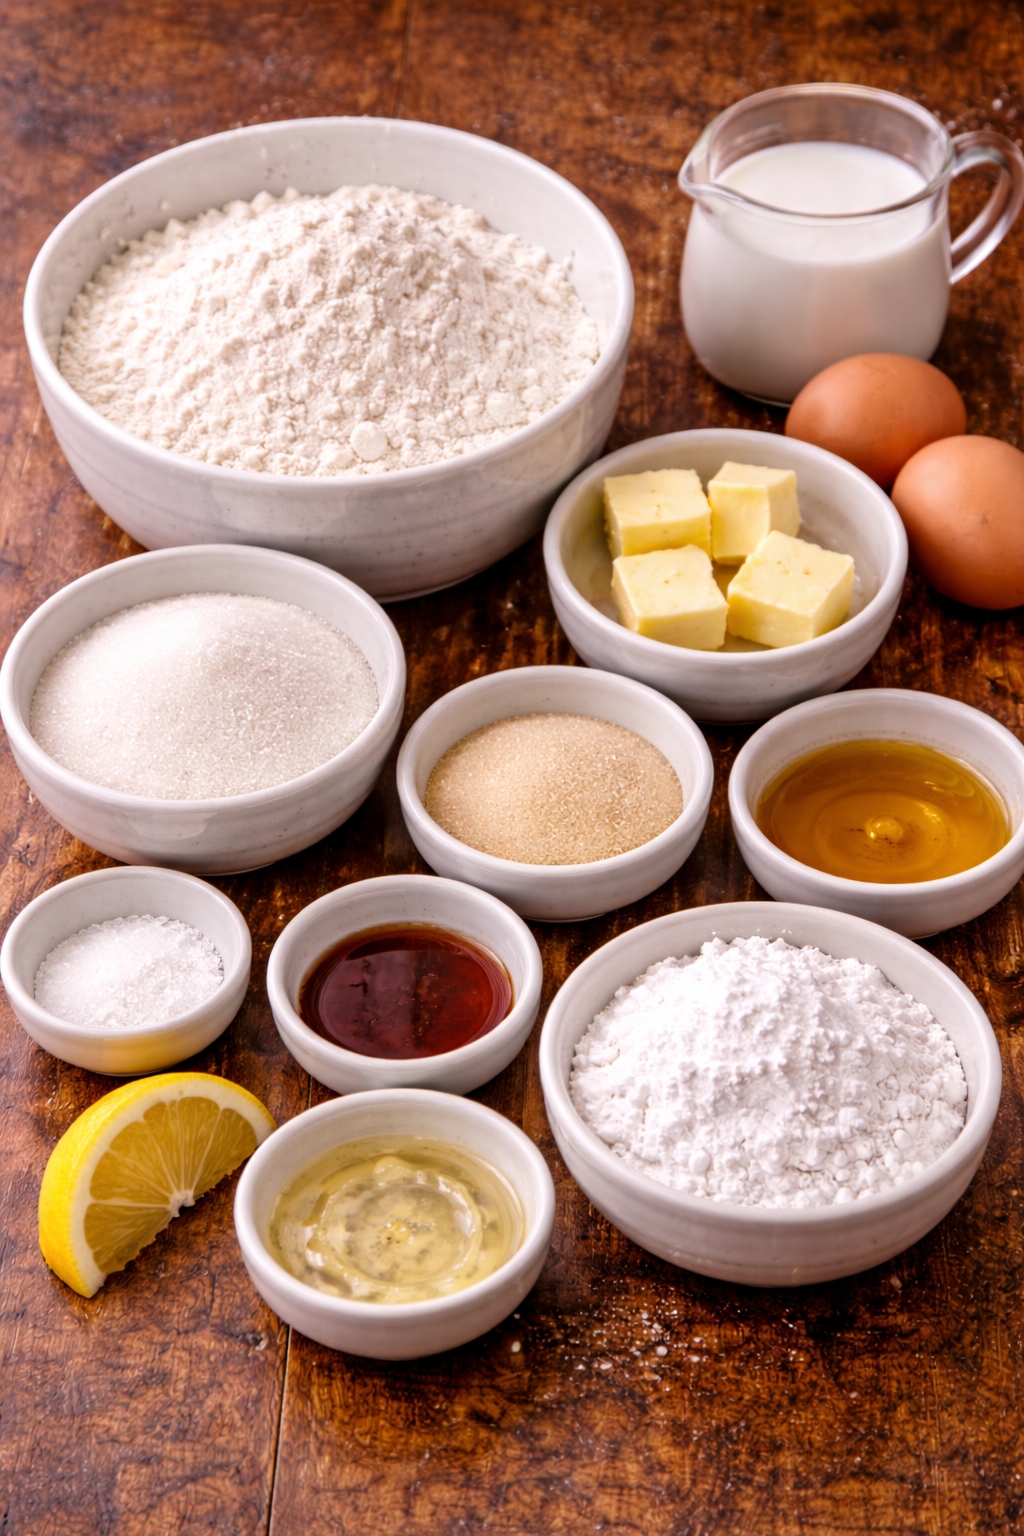
Ingredients
- 1/2 cup whole milk, warm (about 100°F)
- 2 1/4 tsp active dry yeast
- 1/4 cup granulated sugar
- 2 large eggs, room temperature
- 1 tsp vanilla extract
- 1 tsp kosher salt
- 3 cups all-purpose flour
- 6 tbsp unsalted butter, softened
- 4 cups neutral frying oil
- 2 cups powdered sugar
- 3-4 tbsp whole milk (for glaze)
- 1 pinch pinch of salt (for glaze)
Ingredient Notes:
- whole milk, warm (about 100°F) Warm milk jumpstarts yeast activity, but keep it around 100°F so you do not overheat and stall fermentation. The milk also adds tenderness for a fluffy, soft crumb that stays rich instead of dry.
- active dry yeast Let the yeast foam so you know it is alive; a strong bloom means the dough will proof predictably and rise evenly. If it does not foam, replace it now rather than ending up with dense donuts.
- granulated sugar Sugar feeds the yeast and helps the exterior caramelize during frying for a crisp, golden edge. Too much can brown too fast, so stick to the measure to guarantee the center cooks through.
- large eggs, room temperature Room temperature eggs blend smoothly and help the dough emulsify, which supports a tender, brioche-like structure. Cold eggs can make the butter seize later, leading to greasy pockets and uneven texture.
- vanilla extract Vanilla builds a bakery-style aroma that reads as warm and sweet without overpowering the glaze. Add it early so it perfumes the dough, then reinforce with a tiny splash in the glaze if you want a stronger finish.
- kosher salt Salt strengthens the dough so it traps gas during proofing, giving you a light, fluffy interior. It also balances sweetness so the glaze tastes clean, not one-note.
- all-purpose flour Measure flour by spooning and leveling to avoid a dry dough; brioche needs the right hydration to stay tender. Knead until smooth and stretchy so the gluten network is strong enough to hold butter and still rise.
- unsalted butter, softened Add butter slowly so it emulsifies into the dough, creating a rich, tender crumb without greasy streaks. If the dough looks slippery, keep kneading until it turns glossy and elastic again; that is the structure coming back.
- neutral frying oil Use a neutral oil so the flavor stays buttery and vanilla-forward; strong oils can taste heavy. Keep the oil near 350°F so the donuts brown evenly and do not absorb excess oil, which can make them feel dense.
- powdered sugar Powdered sugar dissolves quickly for a smooth glaze that sets into a thin, shiny shell. Sift if it looks lumpy so the glaze stays glossy rather than gritty.
- whole milk (for glaze) Add milk gradually to control thickness: a thicker glaze coats and sets opaque, while a thinner glaze drips in a pretty, crackly layer. If it sets too fast, whisk in a few drops more milk to loosen.
- pinch of salt (for glaze) A tiny pinch keeps the glaze from tasting flat and makes the sweetness feel more balanced. It also highlights the buttery notes in the brioche so each bite tastes richer and more satisfying.
Instructions
-
1Step 1: Stir warm milk, yeast, and a teaspoon of sugar together and rest 5-7 minutes until foamy - this confirms the yeast is active and guarantees a good rise.
-
2Step 2: Mix the yeast mixture with remaining sugar, eggs, vanilla, and salt until smooth - combining wet ingredients first helps the dough emulsify and rise evenly.
-
3Step 3: Add flour and mix until a shaggy dough forms, then knead 6-8 minutes until smooth and stretchy - gluten development creates a fluffy interior instead of a dense crumb.
-
4Step 4: Add softened butter one tablespoon at a time, kneading between additions until fully absorbed and glossy - slow incorporation keeps the dough elastic and prevents greasiness.
-
5Step 5: Cover and let the dough rise 60-90 minutes until doubled, then chill 6-12 hours - the cold rise builds flavor and makes shaping tiny donuts clean and controlled.
-
6Step 6: Roll the chilled dough to about 1/2-inch thick, cut small rounds, and proof 30-45 minutes until puffy and slightly jiggly - proper proofing makes them light, not tight.
-
7Step 7: Heat oil to 350°F and fry donuts 60-90 seconds per side until golden brown, adjusting heat as needed - steady temperature cooks centers through without oily absorption.
-
8Step 8: Whisk powdered sugar, milk, vanilla if desired, and a pinch of salt into a smooth glaze; dip warm donuts and let set 10 minutes - the glaze forms a thin, shiny shell that crackles softly.
Nutrition Facts
Calories 165
Protein 3g
Carbs 24g
Fiber 1g
Sugar 12g
Fat 7g
Sodium 140mg
Potassium N/A
Serving Suggestions
Serve these donuts slightly warm or fully cooled once the glaze has set into a thin, glossy coating. For a bakery-style presentation, stack them in a tall mound on a cake stand or wide plate, then drizzle a little extra glaze over the top so it catches the light. Add a pinch of flaky salt or a dusting of finely grated citrus zest to make the sweetness feel more balanced and aromatic. Pair with coffee, hot chocolate, or a strong black tea for contrast, and offer napkins because the glaze is meant to crack softly with each bite. If you want the crispest edge, glaze while the donuts are just barely warm; for the cleanest finish, glaze when completely cool so the shell sets smooth and shiny.
How to Store?
Store fully cooled, glazed donuts in a single layer in an airtight container at room temperature for up to 2 days; after that, the glaze can soften and the crumb loses its fresh bounce. For longer storage, freeze unglazed donuts for up to 2 months, then thaw at room temperature and warm briefly in a 300°F oven for 4-6 minutes to refresh the exterior. Glaze after reheating so it sets neatly instead of melting. You can also make the dough ahead: keep it covered in the fridge overnight, shape and proof the next day, and fry straight from a cool, easy-to-handle dough for the most reliable results.
If you enjoyed this Tiny Brioche Donuts With Glaze or any other recipe on my blog,
please leave a ⭐ star rating and let me know how it went
in the comments below. I appreciate you taking time to read about this recipe, thank you!


Leave a Comment