Teriyaki Garlic Bread Sliders - These teriyaki garlic bread sliders deliver sticky-sweet, savory chicken tucked into buttery, crisp-edged buns with a soft center. The sauce is glossy and caramelized, balanced by ginger and garlic, while the garlic butter top bakes into a golden, aromatic crust. Each bite hits sweet-salty richness with a little acidity to keep it lively. They are perfect for a fast weeknight meal or a crowd-friendly tray that bakes in one pan with minimal fuss.
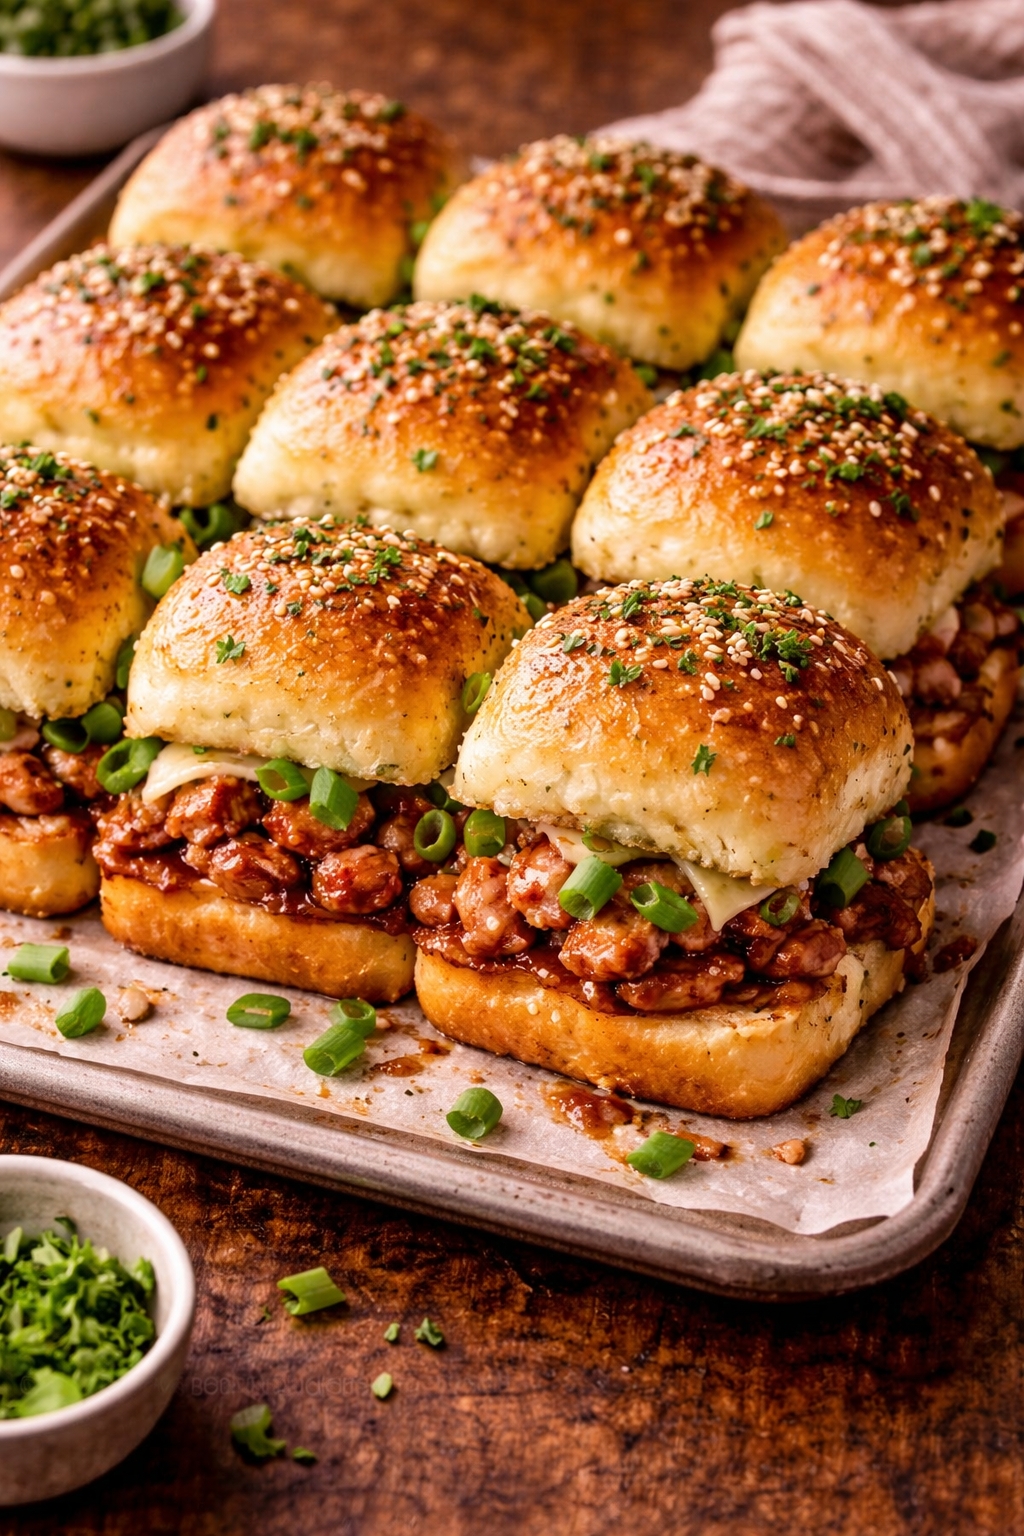
Teriyaki Garlic Bread Sliders - This recipe works because the chicken is quickly seared to build flavor, then coated in a reduced teriyaki glaze that clings instead of running off. After trying multiple approaches, I found that thickening the sauce with a small cornstarch slurry at the end creates the ideal sticky finish without making it gummy; it also helps the glaze caramelize in the oven for that restaurant-style sheen. The garlic butter is not just for taste—it adds fat that crisp-tenders the top of the buns, so you get crunch on the surface and a pillowy interior. Toasting the buns briefly before filling is the straightforward move that delivers professional results, because it protects the bread from soaking up too much sauce and turning soggy. This shows how basic ingredients create something special: a simple skillet sauce and a sheet-pan bake turn everyday chicken into a satisfying, shareable meal. It aligns with my focus on technique over complexity, where a good sear, a controlled simmer, and smart layering guarantee consistent sliders every time.
Dietary Notes
- ✓ Sheet-Pan Sliders
- ✓ Sticky Teriyaki Glaze
- ✓ Garlic Butter Finish
- ✓ Game-Day Friendly
♥
Why You'll Love This
- Big Flavor, Fast: A quick sear and short simmer build flavor with a glossy teriyaki glaze in under an hour.
- Crisp-Tender Garlic Tops: Butter and garlic bake into golden edges while the centers stay soft and satisfying.
- No Soggy Bread: Brief toasting and smart layering keep the sliders sturdy even with saucy chicken.
- Easy to Scale: Double the batch on a larger pan for parties or meal prep with the same reliable result.
Teriyaki Garlic Bread Sliders
👩🍳 Author: Abderrahmane
⏰ Prep Time: 25min
❄️ Cool Time: 0
🔥 Cook Time: 20min
🥨 Yield: 12
🍞 Method: Baking
🌾 Diet: None
★
★
★
★
★
Leave a review
1x
2x
3x
Ingredients
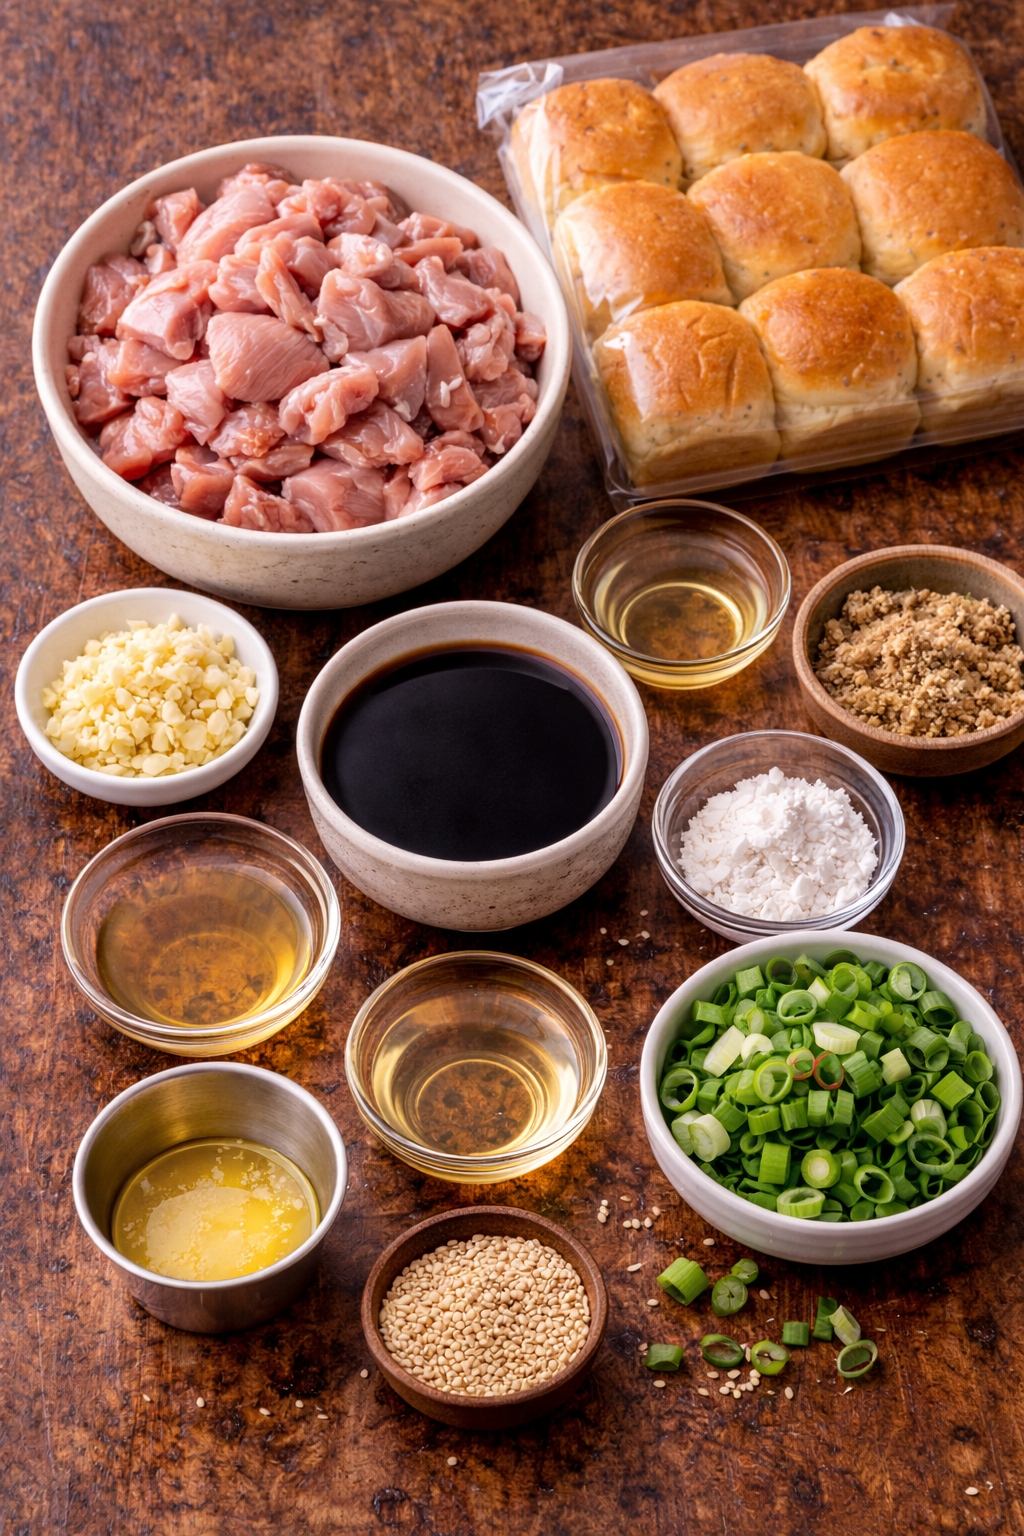
- 1 1/2 lb boneless, skinless chicken thighs, chopped
- 1 tbsp neutral oil
- 5 cloves garlic, minced
- 1 tbsp fresh ginger, grated
- 1/2 cup low-sodium soy sauce
- 1/3 cup brown sugar
- 1 tbsp rice vinegar
- 2 tsp cornstarch
- 12 slider buns (Hawaiian-style)
- 4 tbsp unsalted butter, melted
- 2 tbsp sesame seeds and sliced scallions
Ingredient Notes:
- boneless, skinless chicken thighs, chopped Thighs stay tender and juicy under high heat, which keeps the sliders satisfying instead of dry. Chop into even pieces so they sear quickly, then let the glaze simmer and caramelize around the edges for a sticky, restaurant-style finish.
- neutral oil Use a high-smoke-point oil so you can sear without burning the pan; a hot, lightly oiled surface helps the chicken brown instead of steam. Browning builds flavor early, which makes the final teriyaki glaze taste deeper and more balanced.
- garlic, minced Split the garlic between the sauce and the butter so you get layered flavor: savory in the glaze and aromatic on the crisp tops. Cook garlic briefly so it stays sweet; overcooking can turn it bitter and muddy the sticky sauce.
- fresh ginger, grated Fresh ginger adds a bright bite that cuts the rich, sweet-savory glaze and keeps it from tasting heavy. Grate it finely so it melts into the sauce as it simmers, creating a smooth, glossy coating.
- low-sodium soy sauce Low-sodium soy sauce gives you salty depth without pushing the sliders into overly salty territory once the sauce reduces. Simmer gently so the sauce concentrates and clings, then taste and adjust with vinegar for balance.
- brown sugar Brown sugar caramelizes as the sauce simmers, creating that sticky, glossy teriyaki texture. If the glaze tastes too sweet, add a touch more vinegar to bring back an acidic edge that keeps every bite satisfying.
- rice vinegar A small splash of vinegar balances the rich glaze and helps the sweet-salty flavor feel clean. Add it while the sauce simmers so it integrates fully and keeps the finish bright instead of flat.
- cornstarch Cornstarch thickens the sauce so it coats the chicken and bakes into a shiny, sticky glaze rather than pooling in the pan. Whisk it with cold water first to avoid lumps, then simmer just until the sauce turns glossy and smooth.
- slider buns (Hawaiian-style) Soft slider buns contrast beautifully with the crisp, garlic-bread top, giving you a tender center and golden edges. Toast briefly to prevent sogginess, then assemble quickly so the buns stay fluffy and sturdy.
- unsalted butter, melted Butter creates a garlic-bread crust by crisping the surface while keeping the interior soft. Brush evenly so the tops brown consistently, and bake until golden so the texture stays crisp and enjoyable.
- sesame seeds and sliced scallions Sesame seeds add light crunch and a nutty finish, while scallions bring fresh bite that balances the rich glaze. Sprinkle right after baking so they stick to the warm tops without wilting into the sauce.
Instructions
-
1Step 1: Heat a large skillet over medium-high and add oil until it shimmers - a hot pan helps you sear quickly, building flavor without steaming the chicken.
-
2Step 2: Sear the chopped chicken in an even layer for 3–4 minutes until browned on the edges - browning adds caramelized notes that make the final glaze taste deeper.
-
3Step 3: Add half the minced garlic and all the ginger, stirring 30 seconds until fragrant - brief cooking develops flavor without turning the aromatics bitter.
-
4Step 4: Pour in soy sauce, brown sugar, and rice vinegar, then simmer 3–5 minutes until glossy - simmering reduces water so the sauce starts to cling and tastes balanced.
-
5Step 5: Stir cornstarch with 2 tablespoons water, then whisk the slurry into the simmering sauce until it thickens - thickening creates a sticky glaze that coats instead of pooling.
-
6Step 6: Split the buns horizontally and toast on a sheet pan for 3–4 minutes until just dry on the surface - toasting protects the bread from getting soggy under the saucy filling.
-
7Step 7: Stir melted butter with the remaining garlic and brush it over the top buns until evenly coated - garlic butter bakes into a crisp, golden crust like classic garlic bread.
-
8Step 8: Spoon the glazed chicken onto the bottom buns, spreading to the edges, then cap with the buttered tops - even layering guarantees every bite gets sauce and texture.
-
9Step 9: Bake at 375°F for 8–10 minutes until the tops are golden and the glaze bubbles at the edges - this caramelizes the sauce lightly for a restaurant-style shine.
-
10Step 10: Rest 3–5 minutes, sprinkle with sesame seeds and scallions, then slice along seams - resting helps the glaze set so the sliders cut cleanly and stay satisfying.
Nutrition Facts
Calories 310
Protein 18g
Carbs 32g
Fiber 1g
Sugar 11g
Fat 12g
Sodium 680mg
Potassium N/A
Serving Suggestions
Serve the sliders hot while the tops are crisp and the glaze is sticky and shiny. For a clean tray, cut along the bun seams and transfer with a spatula so each slider keeps its shape, then sprinkle with sliced scallions and sesame seeds for contrast. Pair with a crunchy cucumber salad, quick pickles, or a simple slaw to add fresh, acidic balance against the sweet-savory sauce. If you want the best texture, let the pan rest 3–5 minutes after baking so the glaze sets slightly and the buns slice neatly without tearing.
How to Store?
Store cooled sliders in an airtight container in the fridge for up to 3 days; keep them tightly wrapped so the buns do not dry out. Reheat in a 325°F oven, covered loosely with foil for 10–12 minutes, then uncover for 2–3 minutes to re-crisp the garlic tops; microwaving works in a pinch but softens the crust. The sauced chicken can be made ahead and refrigerated for 3 days, then warmed and assembled right before baking. For freezing, freeze the cooked glazed chicken for up to 2 months; thaw overnight and bake fresh sliders so the bread stays crisp and satisfying.
Other Recipes You'll L❤️ve
If you enjoyed this Teriyaki Garlic Bread Sliders or any other recipe on my blog,
please leave a ⭐ star rating and let me know how it went
in the comments below. I appreciate you taking time to read about this recipe, thank you!
Leave a Comment